By John G. Lambert
The speed that the Japanese moved their battle flag outward across the curvature of the planet was spectacular as the Empire of Japan settled into vast new ocean area holdings.
With the rapidly amassed list of these gains came a growing list of problems to weigh heavily on the balance sheet. Vast distances created difficulties in defending the widely disbursed Japanese forces where a massive ocean area could easily conceal a large, focused, and overwhelming U.S. Carrier Task Force. Japan’s problems were further compounded by their failure to keep pace with wartime production, replacement, and training needs. The island nation lacked an adequate supply of oil, raw materials, and food (and vessels to import them) at the sustained pace that the war, which they started, now demanded. Admiral Yamamoto predicted from the onset that Japan’s chances of victory were grim in a lengthy conflict.
The early months of 1942 had gone well, and “Victory Disease” took hold as Japan rampaged on its offensive. However, Japan’s disastrous carrier aviation losses at Midway, along with their inability to hold Guadalcanal, turned the tide for the United States. Japan was now in an unthinkable defensive posture as 1942 rolled over into 1943. Nevertheless, the Imperial Japanese Navy (IJN) was still mighty and highly dangerous.
The war for the United States in 1942 was marked by crisis and disaster, starting with the blood bath of Pearl Harbor in December 1941. The Japanese Navy sent numerous hulls to the bottom in raging battles fought in 1942. By the end of the year, the United States would suffer the loss of four fleet carriers, leaving only the overworked Saratoga and Enterprise in the Pacific.
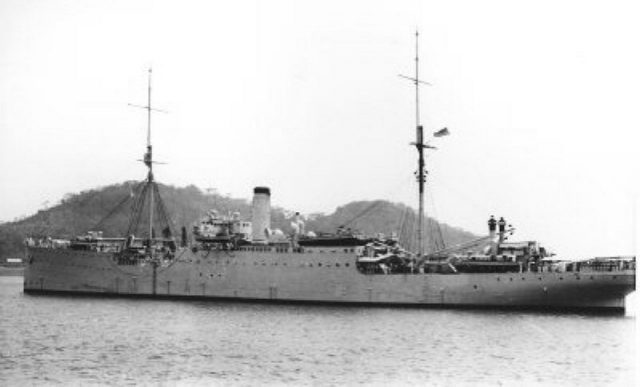
U.S. industrial production ramped up, and nine Independence-class carriers were commissioned in 1943. An expedient of war rushed into action as shipyards built the new large Essex-class fleet carriers, USS Independence (lead ship in her class) was a fast and scrappy light carrier converted from CL 59 (light Cleveland-class cruiser USS Amsterdam). The conversion began during Amsterdam’s construction almost to her main deck at the NYSB yards in Camden, NJ, when the IJN struck Pearl Harbor.
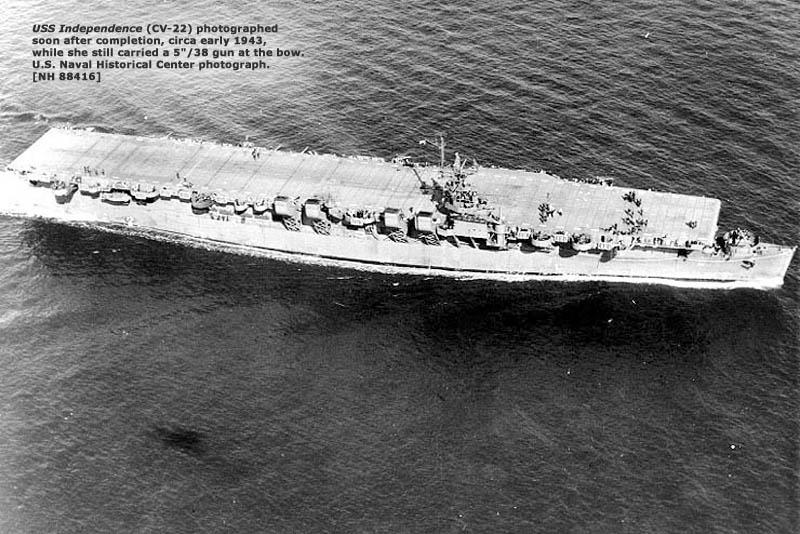
USS Independence (CV 22) as first launched (later redesignated CVL 22)
USS Independence earned a second Battle Star (“Treasury -Bougainville Operation”) on its path toward the Gilbert Islands as Admiral Chester Nimitz began his ocean drive on “The Road to Tokyo.” Rabaul was a major base and significant threat that needed to be neutralized. Independence participated in the raid on the Japanese base at Rabaul on 11 November with new Essex-class carriers USS Essex and USS Bunker Hill.
Steaming with the Southern Carrier Task Group 50.3 with Rabaul on her stern, CVL 22 paid dearly for her third Battle Star (“Gilbert Islands Operation”) with crew fatalities and torn steel that took her out of the war for eight months.
Tarawa is in the Gilbert Islands group on the eastern line of the Japanese outer ring of island holdings. Japan captured Tarawa and Makin Islands two days after Pearl Harbor. The coral atoll is roughly 2,400 miles southwest of Oahu. The Navy tasked Rear Admiral C.A. Powell with the occupation of the Gilberts. A centerpiece of the operation was the Marine Corps and Army landings on Tarawa and Makin Islands scheduled for November 20, 1943, with Apamama on the 21st.
Makin Atoll is north of Tarawa, and Apamama lies south. All three possessed airfields. The Independence Air Group planned to strike targets in support of the invasion and fly CAPs (Combat Air Patrols).
The following are brief glimpses/excerpts of the action:
On Tuesday, November 16th, the Task Group took on fuel from the tanker USS Neshanic and steamed toward the Gilberts, spotting lights in the distance from US-held Funafuti Island (Ellice Island group) at 1844 (6:44 PM local time) as Independence steamed past. The Japanese would send an air raid against Funafuti later that evening.
The following day, a Japanese sub was said to have been sighted roughly 50 miles from the Task Group, and the Independence passed slower transports carrying US troops for the invasion.
Thursday 18 November 1943: DOG DAY (MINUS TWO) TARAWA
Independence was in good company, with carriers Essex, Bunker Hill, cruisers Oakland, Chester, Salt Lake City and Pensacola, and the screening group Fletcher-class destroyers; Bullard, Chauncey, Erben, Hale, and Kidd.
At 0315, Flight Quarters sounded. Preparations were made to launch aircraft for attacks on Tarawa. The Attack Plan for the Independence Air Group was to carry out the following schedule on both 18 and 19 November:
[table id=9 /]All Hellcats were loaded with 2400 rounds of .50 caliber ammunition. Those assigned C.A.P. would carry belly tanks with extra fuel. Those Hellcats assigned with strikes scheduled to launch with only 250 Gallons of fuel.
Avengers launched with 300 gallons of fuel. They were armed with twelve 100lb. GP bombs or 12 incendiary clusters. VF-6 and VF-22 pilots flew Hellcats and VC-22 aviators flew Avengers.
The first strike began at 0559 with strafing aircraft making runs from 4,000’ down to 200.’ Avengers with bombing assignments approached at 6,000’ releasing their ordnance from 1,500’ to 1,000.’ Targets included aircraft, buildings, AA weapons, munitions, fuel storage and supplies.
Hellcats assigned as CAP would proceed to make strafing runs against AA positions once they had been relieved before returning to the ship. Four Avengers and four Hellcats received battle damage, repaired aboard the ship by busy mechanics. Damage to three of the Avengers was caused by the incendiaries being blown back by the slipstream into the bomb bay windows upon release. An Avenger took a nasty 20mm AA hit to one wing. AA guns were silenced, but considerable machine gun and rifle fire were encountered by pilots coming from areas around the runways and taxiway. In all, 18,760 rounds of .50 Cal were expended by the twenty-two Independence VC-22 and VF-6 Hellcats.
At 0743, USS Erben made a submarine contact and dropped eight depth charges.
At 0945, Independence commenced launching Strike Four consisting of twelve Hellcats and eight Avengers. Strike Four would also be joined by aircraft from Essex and Bunker Hill for additional attacks on Bititu. The eight VC-22 Avengers would each carry four 500 pound AN–MK43 GP bombs. They planned to hit buildings, machine gun emplacements and covered artillery positions. Fighters strafed AA positions near the runway, along the south shore and the pier area. Fighters from another carrier bagged a Pete (5 to 10 miles west of Tarawa).
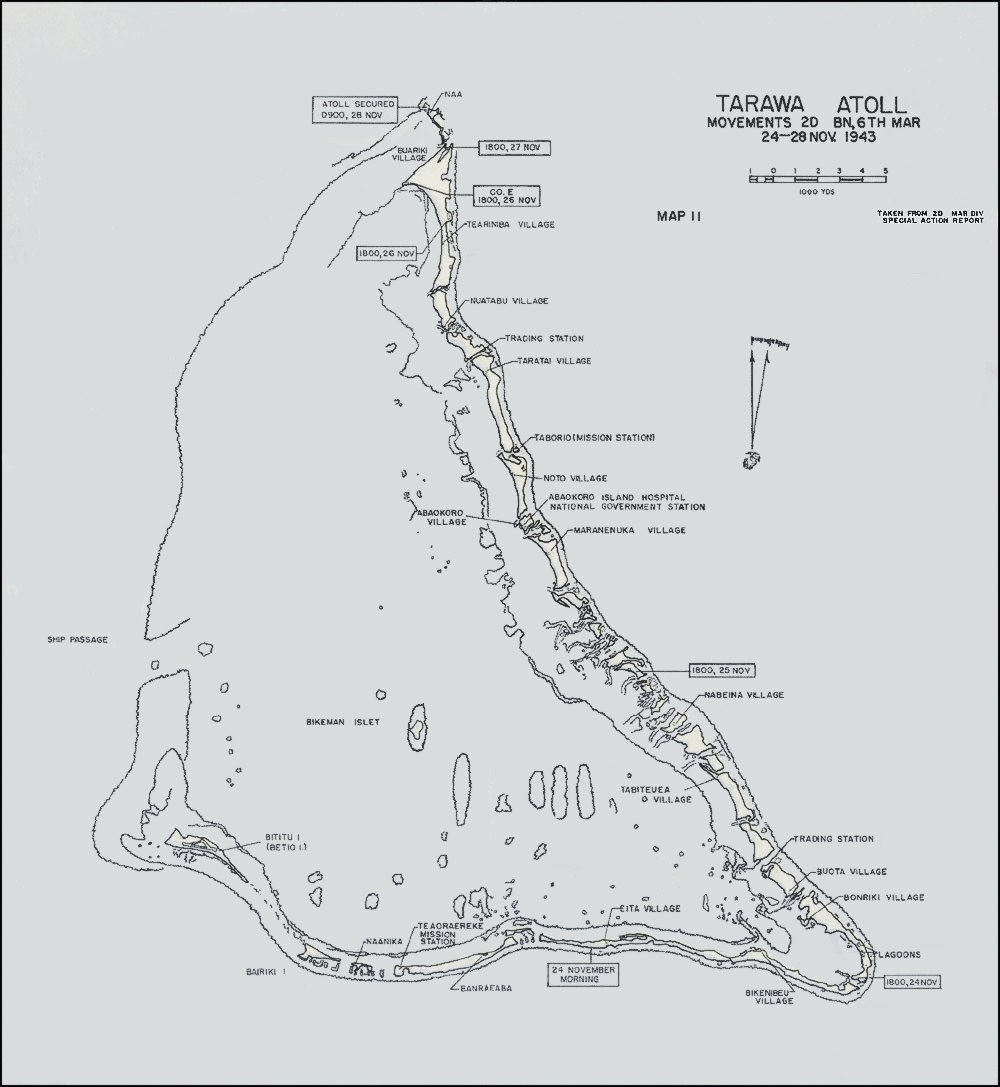
Map of Tarawa Atoll. Bititu Island (Betio Island) on lower left side of the drawing.
Friday 19 November 1943: DOG DAY (MINUS ONE) TARAWA
Flight Quarters sounded at 0315. At 0435, they commenced launching Strike One, VF-22 flying six Hellcats, 95 miles from Tarawa. The sea was moderate with winds from 105°T, visibility ten miles, ceiling unlimited with two-tenths sky cover. Five minutes later, Strike Two launching commenced. VC-22 launched six Avengers, and VF-6 launched six Hellcats. The targets once again were on Bititu. As on the previous day, aircraft launched from Essex and Bunker Hill would strike their targets at almost the same time.
Pilots again strafed buildings and the pier area. Two Avengers returned with AA damage that was repaired aboard the ship.
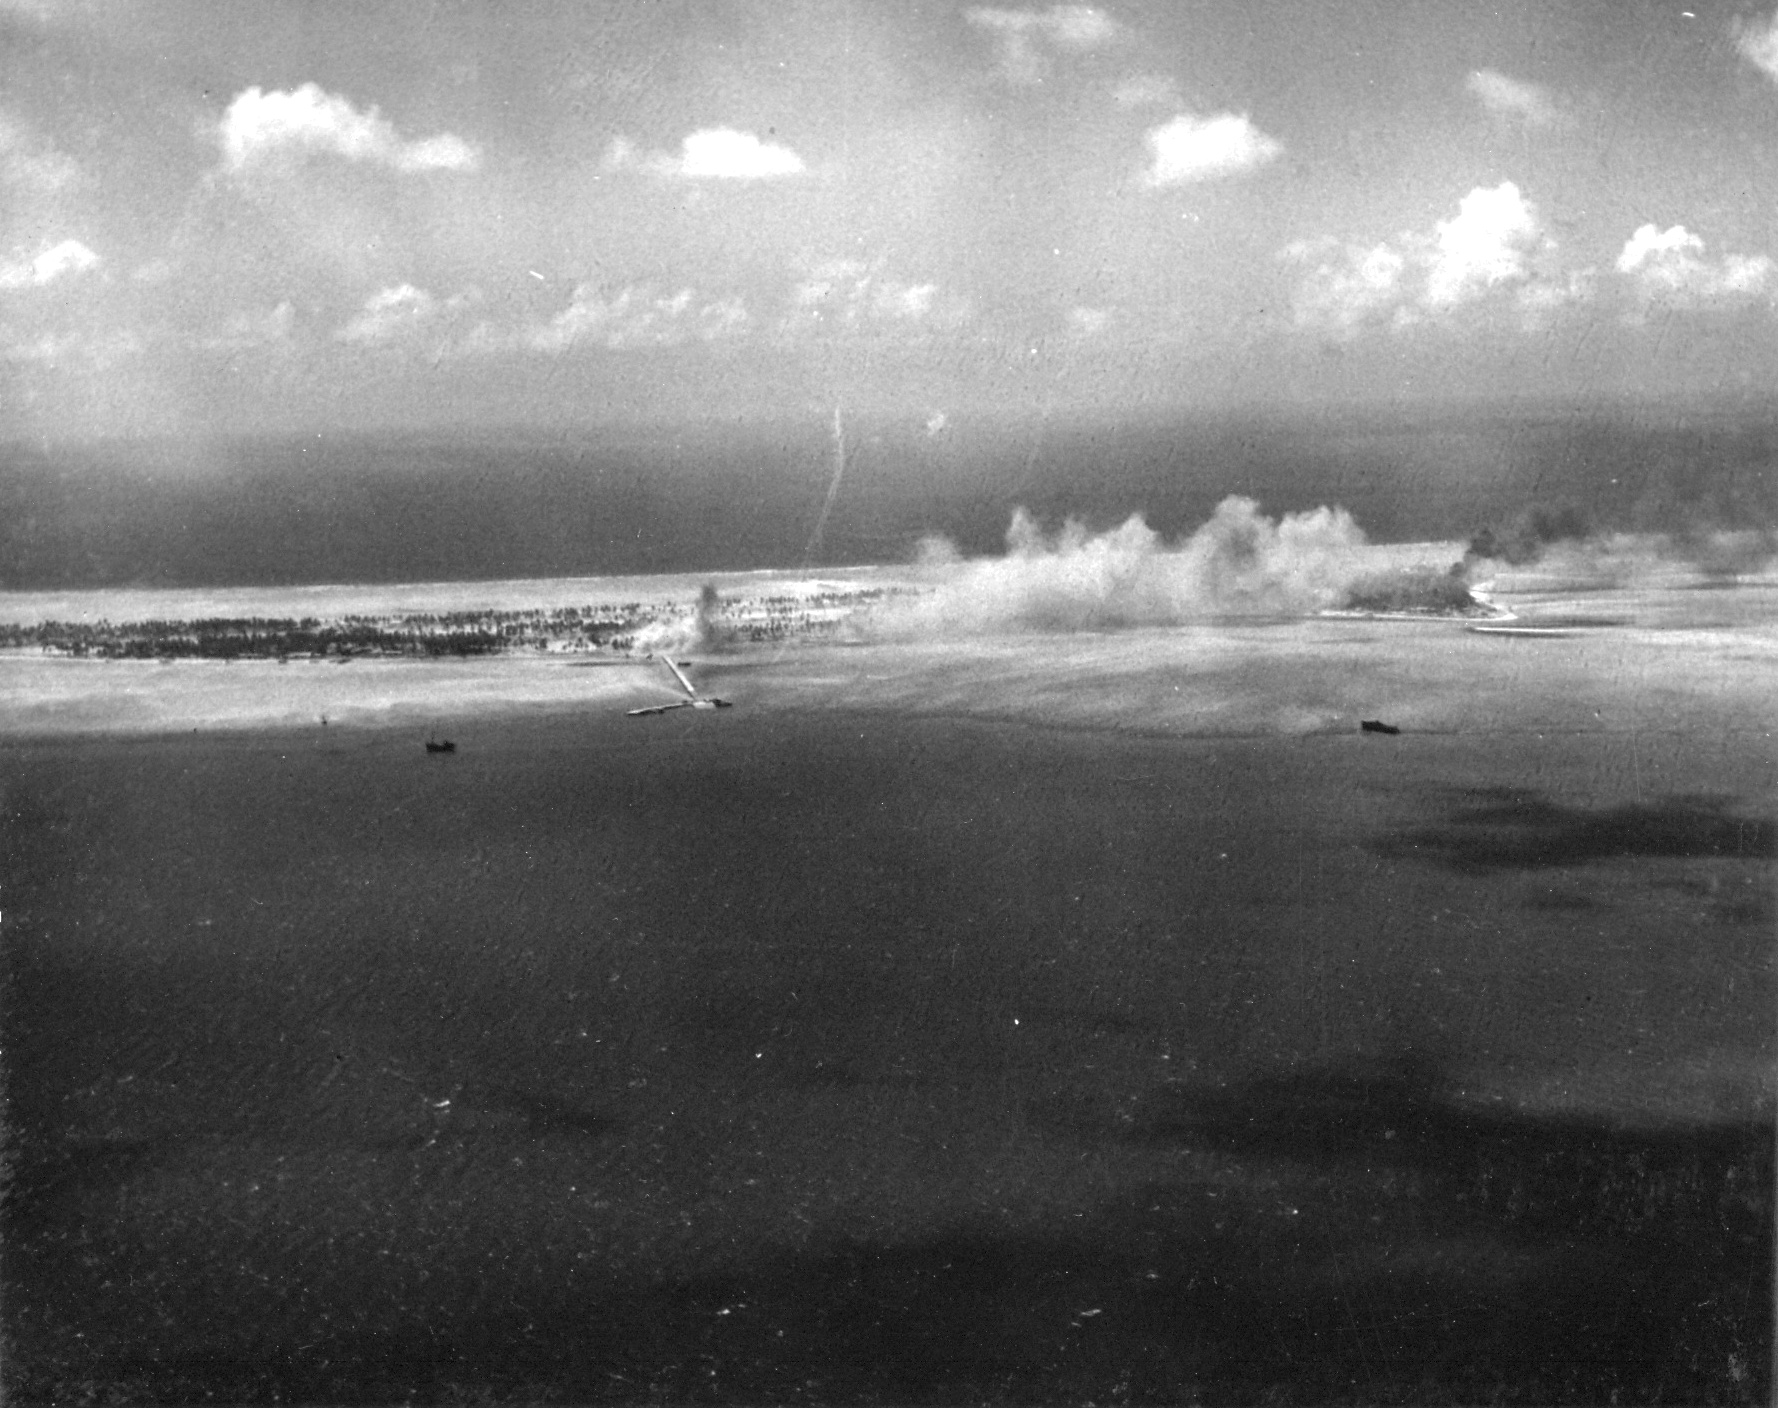
Bititu (Betio) under attack. The Pier area is in the foreground. (US Navy photo: Scanned by John G. Lambert)
At 0805, word came to cancel Strike #4 and maintain deck spot for A.S.P. (Anti-Submarine Patrol) and C.A.P. Belly tanks were installed on all Hellcats for extra fuel.
0815. Four F6F Hellcats from VF-22 were scrambled. A bogey was picked up, bearing 163°T, 36 miles. The pilots of all four Hellcats almost immediately dropped their belly tanks after launch and joined up. Vectored by the FDO, they sighted the Betty 25 miles south of Independence. The dark olive drab Betty zeroed in on Independence to deliver a torpedo attack, flying at roughly 200 knots and 1,000’. The two sections of Hellcats maneuvered in from 4,000’ to bracket the twin engine Betty.
Lt. Clement M. Craig made the first high-side run, knocking out the tail gunner. Ens. Edward C. Dale made a similar run from the opposite side of the Betty, which made a diving 90° turn for the water. Dropping quickly to 50 feet above the surface, it released its torpedo, gaining speed as it shed the weight. Ens. Dale, breaking off his run at the last second, barely avoided the water.
Lt.(jg) Robert A. Richardson and Lt.(jg) James H. Roberts made flat runs on either side of the Betty. Lt. Craig and Ens. Dale then made similar firing passes. Lt. Craig observed fire from the engines as he completed his attack. An explosion followed in the engine area. The doomed Betty crashed into the sea and burned. The victors circled the burning wreckage for 30 seconds, received another vector and departed, as two late arriving Essex F6F’s strafed the slick where the Betty submerged.
Independence launched a CAP of eight Hellcats at 1334 and would begin recovering them at 1750.
The day progressed into night.
Saturday 20 November 1943: Tarawa (Invasion) – Torpedoed
At 0415, Independence sounded general quarters. At 0538, they commenced catapulting strike #1 (Four Avengers), followed by twelve Hellcats.
Between 0715-0721, a second wave of four Avengers and eight Hellcats were launched. The F6F-3 Hellcats were tasked with a CAP over T.U 50.3.1. Visibility was estimated to be 6-8 miles under high scattered stratus at 20,000.’
A Betty was sighted flying low at 100’ off the water by a division led by Lt. Cdr. Harry Harrison. The four Hellcats dropped in from 2,000’ and bracketed the Betty flying at an estimated 230 knots. Harrison and his wingman Lt.(jg) Robert Klingler were on the starboard side as Lt.(jg) Alex Vraciu and his wingman Ensign Robert Bloomfield crossed over the Betty which dropped to 50’ and began making a slow turn to the left. This set up Vraciu and Bloomfield, to make flat side runs on the twin-engine bomber. Low to the water, the Betty dropped its torpedo to gain speed and maneuverability. It didn’t help. Vraciu saw a glow from the wing root just before the Betty hit the water. (Note: Alex Vraciu was to become one of the US Navy’s leading aces with 19 kills to his credit. Alex served with Lt. Cdr. Edward “Butch” O’Hare as his wingman in VF-6 aboard CVL 22 until O’Hare was transferred off to USS Enterprise. (O’Hare, the Navy’s first ace, was KIA six days after the Japanese torpedo hit CVL-22)
Independence recovered the first wave of Hellcats and Avengers from 1144-1154.
At 1336, Independence commenced launching a C.A.P. of eight Hellcats, followed by three Avengers for A.S.P. at 1425. At 1452-1458, four Avengers from the 1144 launch were recovered.
1625. On a course of 330°T, all engines were signaled ahead flank speed. The Landing Signal Officer reported a submarine periscope in the Mighty-I’s wake, distance 2,000 yards, bearing 170°T. They dispatched USS Kidd for hunter-killer operations against the sub. This sub hunt would displace Kidd from her regular screening position. At 1732, the Independence commenced zigzagging 5° left and 5° right of base course, 100°T at 20 knots. The ship darkened at 1750.
At 1754, Independence ceased zigzag, on a new course of 115°T. Minutes later, she recovered her C.A.P. of eight Hellcats.
1758. Course 100°T. A radio warning received by C.I.C. from Lt. Harold McMillan (VC-22) flying on A.S.P. in his Avenger, informed the ship of a large group of low-flying Bettys approaching very low to the water from the west, avoiding radar detection. They sighted fifteen Betty Bombers approaching disposition on the starboard beam bearing approximately 250°T, distance seven miles, altitude 200’ flying at high speed.
The USS Bunker Hill had a C.A.P. in the air at 10,000.’ They attacked the Bettys at 9 miles out claiming two shot down and three probable.
General quarters sounded at 1800, set material condition Afirm and broadcasted the visual contact over T.B.S. (Talk Between Ship). All Damage Control Personnel were moved up to at least above the second deck due the threat coming from a torpedo attack. They donned helmets, flash proof clothing & gloves, and were ordered to lie prone on the deck.
Independence went to flank speed, commenced maneuvering various courses to avoid torpedo attack. The ship made a turn with 20° left standard rudder, to present a stern attack to the oncoming enemy. She steadied up at approximately 50° and commenced turning to the right with standard rudder to avoid enemy planes working around ahead. She steadied up to approximately 100°T and commenced turning left.
The Bettys were deployed in a line when they appeared over the horizon, heading for the Task Group, then made a big circular sweeping turn in toward Independence.
Three of the Bettys broke off from the group to attempt to get ahead of the ship. One of the Bettys in this group of three was shot down.
Twelve of the Bettys turned in and began to close on the Independence. The Bettys flew into a hail of AA. Independence gunners opened up with nine twin 40mm, two quad 40mm, and sixteen single 20mm guns. Six Bombers were shot down by ships guns. Two on the port side, four on the starboard side. Three of the attacking Bettys got to within 100 yards or less. Three other Bettys were shot down by other ships, and one was shot down by a fighter. A number of the Bettys absorbed a lot of damage before being splashed. Four burst into flames as they hit the water.
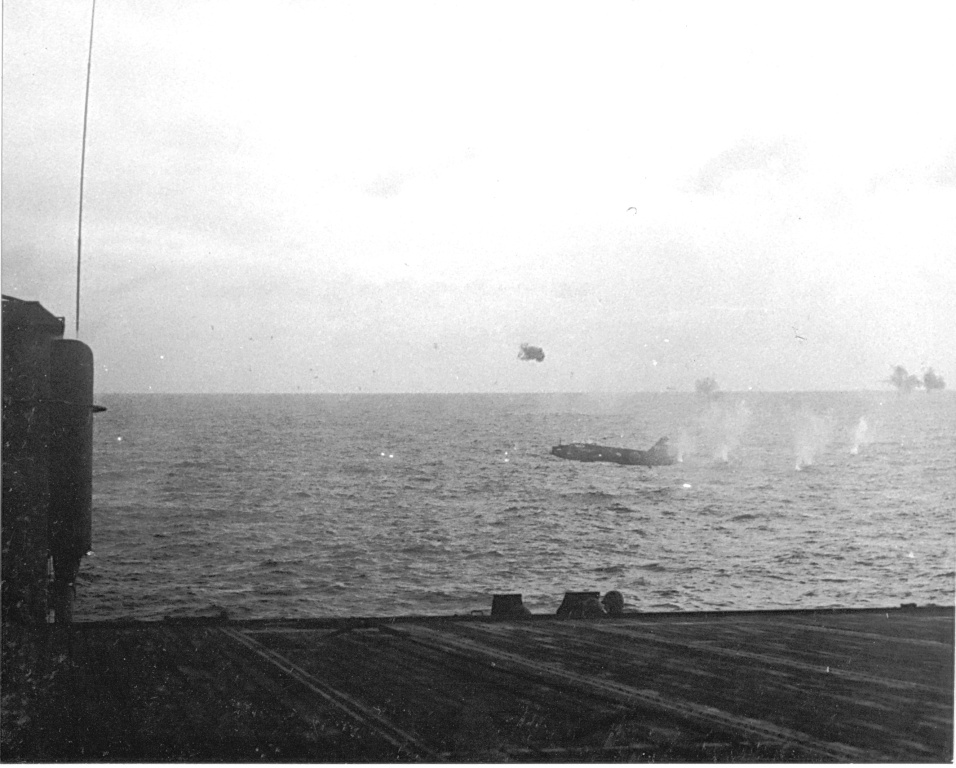
Japanese Betty bomber about to impact the water. (Showing damage to vertical stabilizer from Independence AA fire)
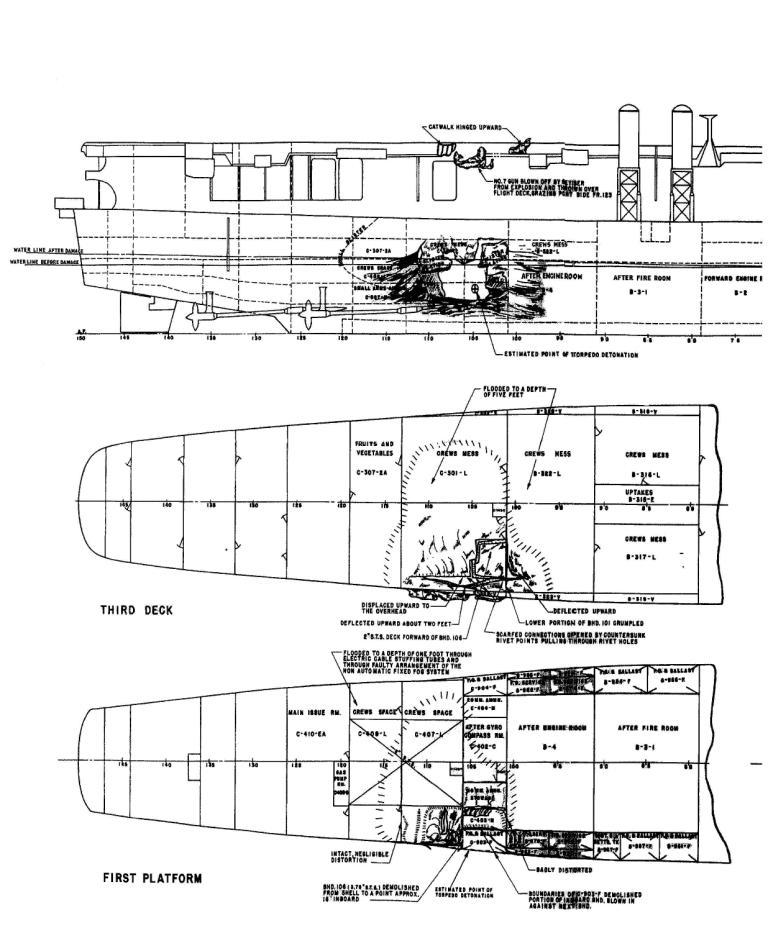
1806. Sighted a torpedo wake approaching from the starboard quarter on a 140° track angle, the ship on a course of approximately 060°T and commenced turn to port. The ship, at high power, with all boilers in line, was making approximately 30 knots.
1807. A Japanese torpedo struck the Independence at frame 103 on the starboard side, roughly 8-12 feet below the water line, flooding after engine room and vicinity. Radio Central lost all receiver power. It shifted to emergency power. Radio II also lost power and lighting. It filled with suffocating smoke. TBS became unreliable. Radio IIA lost power and lighting, flooded with oil and water and had to be abandoned. The TAQ, TBK and the TBM transmitters were rendered inoperative.
All ventilation was secured except for Sickbay, Radar Plot, and the engineering spaces.
Independence began to list and slowly went over to twelve degrees starboard, then quickly righted itself to a seven-degree starboard list. Engineering Department commenced immediate measures to correct the list. The Flight Deck Crew began repositioning aircraft to attempt to help, using aircraft on the flight deck as ballast. Eventually, the list corrected to three degrees to port.
Many compartments below the third deck were flooded between frames 91 and 113, with the third deck flooding to 5 or 6 feet between those frames.
Damage from torpedo delivered by a Betty bomber.
The after engine room filled with heavy black smoke, some flame, lighting was lost, and it flooded to the overhead. It was abandoned with both throttles open, without loss of life. Boilers No.3 & No.4 boilers had to be secured and they flooded with sea water.
The after fire room began flooding slowly (water coming from the after engine room), but was brought under control by lowering emergency pumps down into the space, and rigging emergency power leads for the pumps. Water settled to below the lower grating level with the additional aid of a fire and bilge pump. Bulkheads were shored up and leaks were plugged. (The compartment was emptied of water within eight hours.)
A fire had started burning when oil ignited floating on top of the water in compartment C-301-L. As the compartment continued to flood, the fire self-extinguished due to the inrushing seawater. The compartment was completely open to the sea due to the explosion.
The sprinkling system was activated when the explosion occurred to prevent fire in the hangar bay. It was shut off when it became evident that there was no longer a hazard.
The explosion caused the loss of steering control on the bridge, as well as loss of communication with aft steering. Steering was operated from an alternative feed aft. Steering was facilitated using magnetic compass, using telephone communication to Central Station from the bridge, out to the CPO mess room, and from there by word of mouth to the after steering station. She was making four to five knots at 160 RPM.
USS Independence limped on with forward engine room steam provided by No. 1 & 2 boilers.
Within minutes of the explosion, the No. 1 shaft began a heavy vibration. It rapidly broke in two and was secured. Independence now had only No. 4 shaft available.
The after gyro compass room was flooded to the overhead. The forward gyro compass was knocked out.
1810. Radio II, now filled with smoke, was abandoned on orders from Central Station.
1812. A TBY transmitter was setup on the bridge as a standby for the TBS.
1820. Emergency power failed in Radio Central, to be restored 15 minutes later.
1833. Sighted submarine on port bow, distance about 300 yards. Independence gunners opened fire on the sub. Radio communication was not available as radio circuits were inoperative. USS Hale dropped one depth charge on the contact.
1850. Independence steamed on an easterly course (after the explosion) at a speed of four to five knots.
1935. Speed 13.3 knots making full speed on No.4 propeller shaft, turning 255 RPM. This speed would be maintained for 48 hours. Steering 180°T (still by magnetic compass, using telephone communications from the bridge, to central station, to the CPO mess room, and from there by word of mouth to the after steering station).
2015. Forward gyro back in commission.
2047. Ship on even keel.
2235. Regained steering control from the Pilot House. Heavy cruiser Pensacola, with destroyers Kidd and Hale, stood by Independence and escorted her out of danger.
Post-war interrogation of IJN Commander Goro Matsuura indicates that sixteen Japanese aircraft participated in the raid. They were said to have flown 600 miles directly from Wotje, with a loss of eight aircraft in the attack. (Note: Morrison, Vol. VII suggests that half were from Roi, half from Maloelap.)
** The Betty raid was part of the IJN 775th Air Group that was night trained: Lieut. Nobuki Miyamae led the First Squadron; Lieut. Yoshiaki Akiyama led the Second Squadron. Neither survived. (** Source: “Titians of the Seas” – Belote & Belote)\
The explosive force of the blast, coupled with the hydraulic action of the water displaced vertically against the hull would rip loose the No.7 gun tub with the heavy twin 40mm anti-aircraft gun and its gun crew, sent everything flying from its former position on the starboard side (aft of the stacks) over the flight deck depositing mangled carnage along its path, grazing the port side of the ship, into the ocean, disappearing beneath the surface.
The ships company would suffer a loss of seventeen killed or missing in action, with twenty-three men additionally wounded, to be transferred to other ships for medical treatment.
Initially escorted out of the area by USS Pensacola, USS Hale and USS Kidd, wounded Independence began its slow tortured journey to Funafuti Atoll on one screw.
Independence dropped her port anchor in 25 fathoms of water, coral bottom, 90 fathoms of chain, berth Baker 13, Funafuti Atoll, Ellice Islands at 1139 on 23 November 1943.
Also anchored in the lagoon at Funafuti Atoll was USS Vestal. It was fortuitous that she had steamed in yesterday.
Vestal had been moored outboard, next to USS Arizona on December 7th, 1941 when the Japanese struck Pearl Harbor. Damaged from the horrific blast when Arizona’s magazines blew up, and additionally, also being hit by Japanese bombs, Vestal was repaired and returned to duty. With Cmdr. W.T. Singer at the helm, Vestal was now about to help obtain partial payback for her wounds at Pearl by helping the Mighty-I stay off the bottom, with her hard-working crew, doing what they could to patch up the Independence. Temporary repairs in the initial effort to return the CVL 22 back into the war.
Repair ship USS Vestal.

Painting of the USS Independence by G.R Mackey.
For a more detailed read of the USS Independence, go to the author page HERE: